ListenWIFI User Manual
ListenWIFI
Dear Valued Customer,
Thank you for choosing Listen! We are dedicated to providing you with the highest quality products and take pride in delivering outstanding performance to ensure your complete satisfaction. We independently certify each of our products to the highest quality standards. We are available to answer any questions you might have during the installation or operation of our products. At Listen, it’s all about you. Should you have any comments or suggestions, we’re here to listen.
Here’s how to reach us: +1.801.233.8992 | 1.800.330.0891 Toll Free (USA & Canada) support@listentech.com | www.listentech.com
Thank you, and enjoy your listening experience!
Best regards, The Listen Team
Introduction to ListenWIFI
ListenWIFI is a state-of-the-art assistive listening system that streams live audio at a venue over an existing Wi-Fi network to personal smartphones and dedicated receivers, enabling guests to hear the audio clearly in real-time. The ListenWIFI system has been designed to provide the right audio at the right time and place, even in the right language, seamlessly and automatically. It is used in a variety of applications and environments, such as classrooms, courtrooms, houses of worship, theatres and performing arts, stadiums, and arenas, just to name a few. Whether ListenWIFI is being installed to meet accessibility or compliance regulations, or you simply want to ensure your guests can hear the audio at your venue using their own smartphones, ListenWIFI is a flexible and easy to use solution that will ensure that your guests can hear every word and have a memorable experience. We are confident that you will love ListenWIFI.
This system manual provides information about ListenWIFI and all its components, including setup, deployment on your network, and ongoing management of the system. Additional support materials and resources, including tech notes, application notes, case studies, and recommendations, are available on our website at www.listentech.com/listenwifi-support/
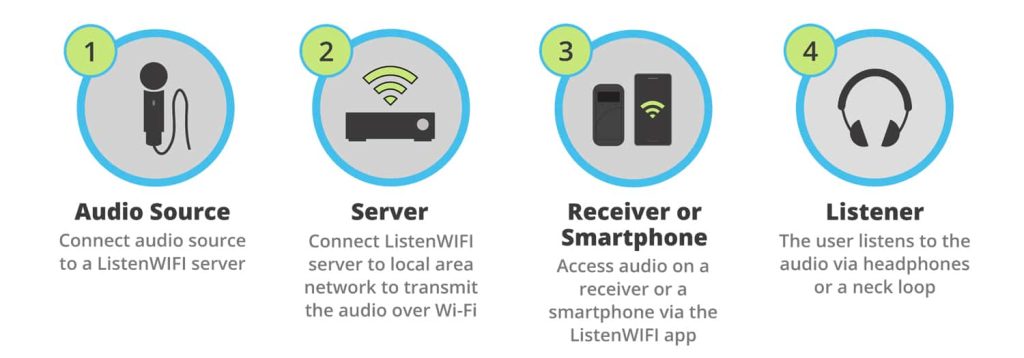
How ListenWIFI Works
The audio server is the main component of ListenWIFI, being connected to live audio sources and the local area network. The server streams the audio it receives over the local network directly to wireless devices that are attached to the Wi-Fi network. Listeners can use either personal smartphones or receivers to access and hear the live audio.
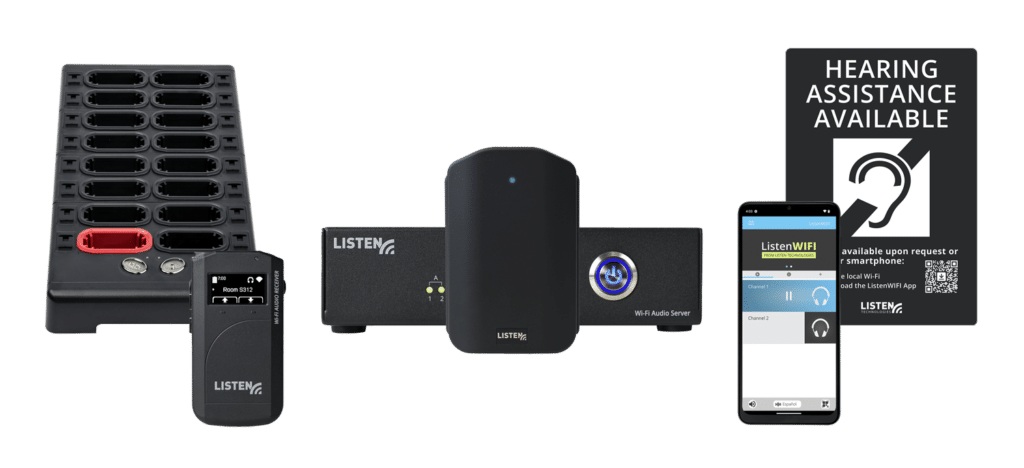
Components
The ListenWIFI system consists of the following available components:
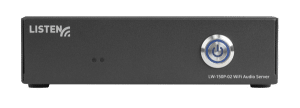
The server is the main component of the ListenWIFI system. It is connected to the existing network to distribute real-time low-latency audio to mobile apps and/or dedicated receivers. Servers support up to 500 listeners and stream 2, 4, 8, or 16 audio channels depending on the model. However additional servers can be used to support more users and audio channels. Being designed as a highly scalable solution, additional servers can simply be plugged into the same local area network where both the channel and listener counts will simply be stacked from all servers.
The mobile apps are required for end users to stream audio directly to their own smartphone, which is available as free downloads for both iOS and Android devices at the App and Play Stores. Smartphones that have the app installed and running while connected to the Wi-Fi network will be able to discover and access audio channels on the network provided from the Wi-Fi Audio Server(s). Simply plug in wired headphones to listen (recommended) or an inductive neck loop for use with hearing aids equipped with a T-Coil. Audio channels are accessed via one of the available access methods:
1. Manual selection from an available channel list.
2. Automatic access to a channel when the user enters a certain room/zone. This is accomplished by using Beacons which enable automatic location-based triggering.
3. Scanning a QR code within the app to access a specific channel.
Channels can also be password/PIN-protected for any of the above access methods.
Dedicated Wi-Fi Audio Receivers are small handheld devices that stream the audio from the Wi-Fi Audio server over the Wi-Fi network. Receivers are often required for venues that want to meet compliance laws that mandate receivers must be made available (ADA/CBC/IBC/DDA/etc.). Receivers are also beneficial for venues that would rather manage and check out dedicated hearing assistance devices, thus avoiding the hassle associated with supporting personal smartphones. Simply plug in wired headphones to listen (recommended) or an inductive neck loop for use with hearing aids equipped with a T-Coil. Audio channels are accessed via one of the available access methods:
1. Manual selection from an available channel list.
2. Automatic access to a channel is available when the user enters a certain room/zone. This is accomplished by using Beacons which enable automatic location-based triggering.
Channels can also be password/PIN-protected for either of the above access methods.
Beacons are small wall-mounted units that allow for a fully automated experience at a venue. Beacons transmit a constant signal with information that the mobile apps and receivers can use to determine its relative location or proximity to an area or zone. By locating beacons throughout a venue, the correct audio channel can be delivered automatically to listeners based on their physical location, eliminating users needing to select a channel from a list or scan a QR code to obtain access. Beacons allow venues to seamlessly provide the right audio at the right time and place, even in the user’s preferred language. Beacons are an ideal accessory for any application with 2 or more channels or for single-channel applications where audio should only be accessible in a specific area.

The ListenWIFI Manager is a free Windows®-based software installation that is required for the configuration of ListenWIFI system components, including servers, mobile apps, receivers, and beacons. The Manager provides an easy way to access, configure, deploy, and manage all ListenWIFI equipment at a venue, including network configuration, channel names, and gain, channel visibility and access controls, channel routing, mobile app customizations, beacon automation, QR codes, firmware updates, inventory management, etc. The Manager software supports a full access administrator/owner account, and limited capability operator accounts to support day-to-day administration. The Manager software is not required to run persistently and is optional once the ListenWIFI system has been configured and deployed.

Many accessories are available for the ListenWIFI audio line, including docking/charging stations for receivers, venue signage, ear speakers, headphones, neck loops, etc. More information can be found on our website at www.ListenWIFI.com.
System Set-Up
It’s recommended that the IT staff at your venue be involved during the set-up and deployment of the ListenWIFI system. Network and firewall settings may block the required traffic on the network, requiring the involvement of IT to ensure the proper network configurations have been implemented. See the Network Requirements section for more details.
- Install Wi-Fi Audio Servers on the Network
a. Place the server(s) where it can easily be connected to power, audio source, and a network connection. The server can be rack mounted using the LW-327 ListenWIFI 2 Channel Server Rack Mount, or by using the rack ears provided (full width 1RU servers only).
b. Connect the server(s) to a power outlet using the provided power supply. Once plugged into power, the server will automatically turn on and the front power LED will flash blue until a valid network connection is established (next step).
c. Connect server(s) to the local area network, or router, using a Cat 6 ethernet cable (6’ cable provided). The front power LED will stop flashing and turn solid blue indicating a successful connection to the network with a valid IP address. Note that IP settings of the server can be managed via your router or using the ListenWIFI Manager Software.
d. Connect the audio sources to the server using any available audio inputs.
For more details on Wi-Fi Audio Servers, see the Wi-Fi Audio Servers section.
2. Log in to the ListenWIFI Manager Software
a. Download and install the ListenWIFI Manager Software for Windows® located on the ListenWIFI support page. The Manager software should be installed on a computer that is kept local to the venue and can be accessed by system owners/administrators as needed. Please note that one login with full administrative access is allowed per ListenWIFI system, known as an Owner account.
b. Create the Owner account by specifying a username and password as well as security questions for password recovery. This account will be the owner of the venue with full administrative access. Please note that limited-access Operator accounts can later be created under the Owner account, providing operators with access to basic functionality of the ListenWIFI system such as inventory management and check-out mode.
For specific details on the ListenWIFI Manager, see the ListenWIFI Manager section.
3. Assign Venue Wi-Fi Network
a. From the Venue page, assign the Wi-Fi network that the ListenWIFI system will be deployed on. This should be the same network or VLAN that the servers were connected to in Step 1c. The Wi-Fi network can be assigned by selecting an available Wi-Fi network from the list and typing in the password, or by manually typing in the network SSID and credentials. This Wi-Fi network will be programmed into all Wi-Fi Audio Receivers added to your venue. If not using Wi-Fi Audio Receivers, this step is not required.
4. Add Audio Server(s)

a. From the Servers page, discover and add Wi-Fi Audio Server(s) to your venue by clicking on the blue add icon. Make sure your computer is on the same local area network as your server(s) to facilitate discovery. If your server(s) are not automatically discovered, it is possible that your network may block the automatic discovery protocol (mDNS), in which case you will need to manually add the server(s) using their IPv4 address.
b. Provide a friendly name for each added server. The default name of each server will show up as ‘Audio Server XXXX’ with the last 4 digits of the Server ID being represented, which is printed on the server’s label located on the bottom of the unit.
NOTE: Once servers are added, the Manager will display ‘Connected’ towards the top, indicating that the Manager has an active connection to all server(s) added to your venue. A ‘Connected’ status is required to edit many of the venue components throughout the Manager software, including servers, receivers, and mobile apps.
5. Configure Server Channels
a. Select a server from the Servers
b. Configure each server to stream either Mono (default) or Stereo channels by clicking on the Mono/Stereo switch in the center status panel. Note that stereo operation will reduce the total number of channels by 50%.
c. Click on the Mixer tab to access channel configuration options:
i. Name each channel as desired for display on listening devices.
ii. Choose if you want to Password/PIN protect each channel by clicking on the padlock icon and specifying an alphanumeric value, and specifying if the protection applies to mobile apps only, or to both mobile apps and receivers. This Password/PIN will need to be communicated to ListenWIFI users to access the channel(s).
iii. Choose if you want to set channels as Visible (default) or Hidden, by clicking on the eye icon. When a channel is set to Hidden, it will not be displayed on listening devices for manual selection. Hidden channels require a trigger to access the channel using either beacons (automated access) or QR codes (manual access).
iv. Choose if you want to specify a Public Address (PA) channel by clicking on the announcement icon. When a PA channel is set, any audio detected on that input will temporarily be routed to all other channels for the duration of the audio presence. Note that only one PA channel can be set per venue across all servers.
v. Adjust the gain of each input as needed for proper level control. Gain can be applied on each input in 6dB increments, up to a maximum of 24 dB of gain.
vi. Adjust the delay of each input as needed for proper alignment of audio to other sources, such as ambient sound, loudspeakers, video displays, etc. Delay can be applied to each input up to a maximum of 3 seconds of delay.
vii. If you have extra channels that will not be used, simply drag and drop the associated inputs to the bottom of the screen to the “Unused Inputs” section.
NOTE: Multiple inputs can be bundled into a single channel to support multi-lingual listening applications. Simply drag and drop inputs onto a channel and specify a unique language for each input. This allows users access to any of the specified languages when they have access to the channel. Additionally, users will automatically hear the channel in their preferred language based on the current language setting on the mobile app or receiver.
For specific details on server configuration options, see the Servers section.
6. Add and Configure Beacons
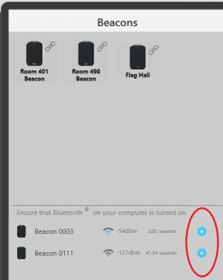
a. From the Beacons page, discover and add optional Beacons to your venue. This can be done using one of two available methods:
i. Connect each beacon to the computer via USB cable. The beacon will automatically be added to your venue.
ii. Discover each beacon wirelessly using the “Scan for Beacons” feature. Make sure the beacon is powered on and Bluetooth (BT) is enabled on the computer. Discovered beacons can then be added to the venue by simply clicking on the blue add icon.
b. Configure each beacon by selecting a beacon in the left panel. Beacons can be configured directly over USB or via a Bluetooth connection. If the Manager does not have an active USB connection with the beacon when selected, it will attempt to connect over Bluetooth in which case you want to make sure that the beacon is powered and within range.
For specific details on beacon configuration options, see the Beacons section.
7. Add and Configure Receivers
a. From the Receivers page, add receivers to your venue by simply plugging them in directly via USB or through a Docking Station connected to the computer. Receivers are automatically added and assigned to the Venue Default profile.
b. To configure receivers, click on the Venue Default profile which will highlight all receivers assigned to the profile and opens a profile editor to the left.
i. Under the Settings tab, configure the receivers preferred listening language, default volume, display brightness, and power saving modes as desired.
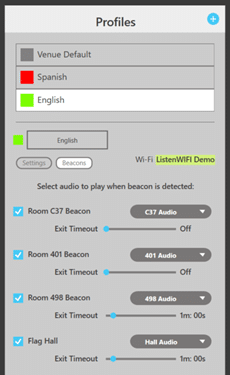
ii. Under the Beacons tab, select the audio channel to be automatically played when the receiver enters the range of an assigned beacon (if using beacons). Note that beacons must first be added to the venue before you can assign channels to be automatically played.
Tip: Profiles are simply a saved configuration or group of settings that can be applied to one or more receivers. Additional profiles can be created by clicking on the + icon towards the top of the screen. Profiles can easily and quickly be assigned by dragging and dropping the profile onto a receiver.
For additional details on receiver configuration options, see the Receivers section.
8. Configure Mobile Apps
a. From the Mobile Apps page, access individual customization options and configuration settings for guests choosing to connect to the audio with their own smartphones.
b. Configure the mobile app appearance by clicking on the following sections:
- Welcome screen (logo, video, or image)
- Define app theme colors
- Upload banner images
- Upload channel images
- Upload documents
- Upload offers
c. Under the Beacons section, select the audio channel to be automatically played when the receiver enters the range of an assigned beacon (if using beacons). Note that beacons must first be added to the venue before you can assign channels to be automatically played.
d. Create and print Channel QR codes by clicking on each channel and tapping the QR code icon. Note that these QR codes are only needed if Beacons will not be used to automatically connect listeners to the proper audio channel.
For additional details on mobile app configuration options, see the Mobile Apps section.
9. Functional Testing
a. Using a smartphone:
- Connect to the Wi-Fi network.
- Open the ListenWIFI mobile app.
- Verify that the mobile app successfully connects to servers and displays channels for manual selection, or alternatively shows the “Ready for Audio” screen when all channels have been hidden.
- Access the audio channel(s) and verify good audio quality and latency. Channel access will be dependent on setup:
- Manual selection – tap on a channel or scan QR code.
- Automated selection – simply enter beacon zones and verify the app automatically connects to the channel when in range of the beacon.
b. Using LWR-1050 Wi-Fi Audio Receiver
- Power on the receiver and connect an ear speaker or headphone.
- Verify that the receiver successfully connects to the Wi-Fi network.
- Verify that the receiver successfully connects to servers and displays channels for manual selection, or alternatively shows the “Ready for Audio” screen when all channels have been hidden.
- Access the audio channel(s) and verify good audio quality and latency. Channel access will be dependent on setup:
- Manual selection – tap on a channel or scan QR code.
- Automated selection – simply enter beacon zones and verify the app automatically connects to the channel when in range of the beacon.
For additional setup and configuration options, see the ListenWIFI Manager section.
In case of issues, please refer to the Troubleshooting section.
Wi-FI Audio Servers
Quick Reference:
ListenWIFI 2 Channel Wi-Fi Audio Server (Analog)

ListenWIFI 2 Channel Wi-Fi Audio Server (Dante):
ListenWIFI Multi-Channel Wi-Fi Audio Server (Analog)
Audio Inputs:
The following audio sources are available depending on the specific model of server:
1. RCA Audio Inputs: Use the provided RCA connection cable to input audio to the server. The RCA connectors are consumer line level, unbalanced, and sum-t-mono input.
2. Terminal Block Inputs: Connect audio to the server using the terminal block connectors on the server. The terminal block connectors are professional line-level balanced inputs
3. Dante Input: Connect the provided Cat6 cable from the Dante® network to the servers Dante input. Please note that Dante® settings can be accessed and managed via the Dante Controller® software available from Audinate®.
Note: Servers are default configured to operate in mono. To change the audio to stereo operation, connect the audio to the right and left audio inputs and configure the server for stereo operation in the ListenWIFI Manager software.
For additional information on how to properly wire and connect audio to your server, please see the “Audio Input Connections” Tech Note available at ListenTech.com/listenwifi-support.
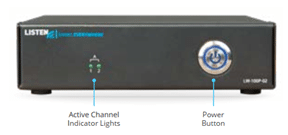
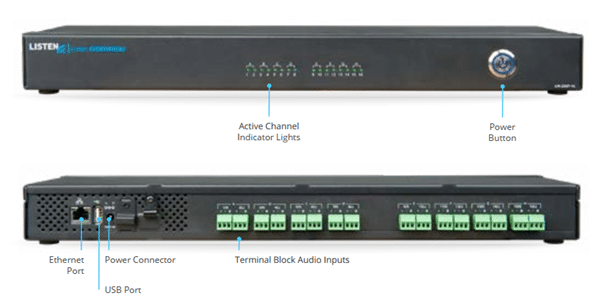
Audio Indicator Lights and Audio Gain:
For servers with analog inputs, active audio level lights on the front of the server indicate audio levels being received by the server (see image). To ensure proper gain, make sure that the audio indicator light is flashing green on a regular basis indicating a good audio level. If the audio indicator light is not being lit often or not at all, input gain needs to be applied to ensure an adequate level on the listening devices. We recommend that the gain be turned up at the sending device prior to being input to the server to allow for the best signal to noise ratio and audio gain performance. If this is not possible, then the gain be turned up inside of the server using the ListenWIFI Manager software. Up to 24dB of gain can be applied as required in 6dB increments. See the ListenWIFI Manager Software section for additional details.
Server Load: Each server can deliver between 1 – 16 channels, while supporting up to 500 listening devices including mobile phones and Wi-Fi Audio Receivers. If additional channels or higher user counts are needed, ListenWIFI can easily be expanded by stacking servers allowing up to 512 channels and 16,000 users! See Server Stacking section below.
Server Stacking: ListenWIFI is a scalable solution that can easily be expanded to support additional channels and users at any time. By simply plugging additional servers into the same local area network, the ListenWIFI servers will operate as one system offering more channels and able to support additional listening devices. This flexibility allows venues to deploy a smaller number of channels or rooms today, while allowing easy expansion into additional rooms and channels later. This flexibility also allows servers to be physically located throughout a venue in different areas or rack closets, supporting the needs of larger venues who may require a distributed system. This approach also ensures that if one server goes down, only some channels will become unavailable and will not take down or impact the entire ListenWIFI system. Up to 32 servers can be placed on the same local area network.
For more information, please reference the “Server Stacking” Tech Note available at https://www.ListenWIFI.com/support.
Input and Channel Configurations
ListenWIFI servers are in mono by default, with input 1 pointing to channel 1 output, input 2 pointing to channel 2 output, etc. This configuration can easily be changed in the ListenWIFI Manager software, allowing any input to be associated with any channel output by simply dragging and dropping the inputs around. Inputs and Channels settings are accessible by clicking on the Server page, selecting a server, and clicking on the Mixer section.
Input Settings:
- Gain: Up to 24 dB of gain can be applied to each input, in 6dB increments.
- Delay: Up to 3 seconds of delay can be applied to each input, in 20 mS increments.
Channel Settings:
- Channel Name: Channel names appear on both mobile apps and receivers and can be customized using alpha-numeric characters and some special characters.
- Hidden Channel: When a channel is hidden, it is not displayed for manual selection on listening devices. Hidden channels instead require the use of a beacon where users are automatically connected to the channel when they enter the range of a beacon. Alternatively, QR codes can be used with mobile devices, allowing access to the audio channel when the QR code is scanned. By default, channels are visible and displayed on listening devices for selection.
- Locked Channel: For highly secure applications where Hidden channels do not provide enough security, password protection can be enabled per channel. Whether the channel is hidden or visible, when the channel is selected the user will be prompted with the input of the password. Locked channels can be applied to mobile devices only, or mobile apps and receivers both.
- PA Channel: A Public Address (PA) channel can be set to override all other channels temporarily whenever the presence of audio is detected on the PA channels associated input. This feature is useful for emergency override and public address announcements, as the audio is routed to all listeners regardless of what channel they are listening to. Once the PA override event ends, the listeners will be returned to their previous channel. One Public Address channel (PA) can be set per Venue across all servers.
Multi-Lingual Audio Configuration:
For venues who have multi-lingual audio channels, ListenWIFI can be configured to associate multiple inputs (languages) to an individual channel. For a multi-lingual channel configuration, multiple inputs are associated to a single channel output. From the Server Mixer tab in the ListenWIFI Manager software, simply drag and drop multiple server inputs to the same channel output and specify the language of each input. When a user accesses that channel, multiple languages will be made available on the listening devices which the user can select from. See ListenWIFI Manager section for more details.
Power Button LED
ListenWIFI Servers have a blue power LED on the front which is used to indicate the status of the server. This allows for a quick glance during operation to determine its status. See table below.
LED Mode | LED Timing | Interval | Detail |
BOOTUP | Blinks once per second | .5 seconds on | Indicates server is booting up and establishing a network connection |
OPERATING | Solid LED | 100% ON | Indicates server is fully booted with valid network connection, ready to stream audio |
UPDATE (or RESET) | Blinks twice per second | .25 seconds on | Indicates server is receiving an update, or the server is being reset to defaults. |
Network Settings
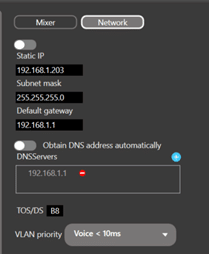
TheListenWIFI server is by default configured as a DHCP client, which means it will receive an IP address, subnet mask, gateway, and Domain Name Server (DNS) address automatically from the network it is plugged into. If it is desired to configure the IPV4 settings directly on the server, click on the Servers page in the Manager software, click on the server and select the Network tab to specify these IPV4 settings (see image).
ListenWIFI audio packets are prioritized over other network traffic using Quality of Service (QoS) to ensure that ListenWIFI audio streams are sent over the network as quickly as possible, high priority, to ensure low latency for live audio applications. ListenWIFI audio packets are prioritized using a Type of Service (TOS) or Differentiated Services (DS) field, which is set to “0xB8” by default. This field can be changed as needed depending on the network by editing the TOS/DS field. Typical values are 0xD8 or 0xB8 depending on the local network. Some experimentation may be required to choose the optimal value.
Additionally, the priority of the network traffic can be set based on the VLAN priority of either Voice or Video. The default value of “Voice” is recommended but can be changed to Video if it provides a better experience on your network with lower latency and less dropouts. Some experimentation may be required to choose the optimal value.

Mobile App
Operational Instructions:
1. Download the FREE ListenWIFI Mobile App: 
The mobile app is available to download for free, without any advertisements or recurring payments required.
2. Join the venue’s Wi-Fi network. This can be accomplished by manually selecting the network from the phone’s Wi-Fi list, or by scanning a Wi-Fi connection QR code using the phone’s camera.
Tip: Wi-Fi Connection QR codes can be generated from the ListenWIFI Managers Venue page.
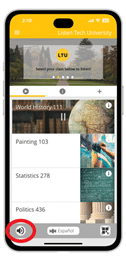
3. Launch the app and listen on your smartphone. Audio channels are then accessed depending on channel configuration:
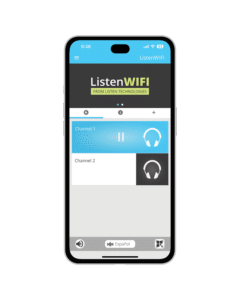
a. Visible Channels: Channels are always visible within the mobile app and accessible to the user. Channels are manually selected from the available channel list. Simply swipe up and down to navigate and tap on a channel to begin streaming that audio channel. Tap on the channel again to pause/play or select a different channel to listen to.
b. Hidden Channels: Channels are hidden from view on the mobile app and require the mobile device to receive a trigger to access the audio channel. This trigger can either be automated using installed beacons, or manual using QR codes:
- Listen Beacons – Requires the user to be in a specific location where the channel is then made available in the mobile app when in range of a beacon. The mobile app will only have access to 1 hidden channel at a time. When a user enters a specific room or zone, the channel will automatically appear on the display and begin playing. When the user leaves the area or enters another beacon zone, that channel can also be removed from the display (configurable via Exit Timeout).
- QR Codes – Requires users to scan a QR code when in each room or zone to access the audio. These QR codes are generated from the Manager software and be printed or exported directly from the software. Users simply use the in-app QR code scanner to access the audio channels in each room. Only one hidden audio channel can be accessed at a time.
- Hidden and Visible Combination: Some channels are always visible and available for selection, while others require that the mobile device receive a trigger to access the audio (either automated using Beacons, or manually using QR codes).
Channel configuration is available in the Servers Mixer section of the Manager software. When using Hidden channels and beacons with the mobile apps, subscription to those beacons is required which can be configured in the Mobile Apps beacon section of the Manager software.
Tip: It is recommended that wired headphones be used with ListenWIFI to ensure low audio delay when lip sync is important. The use of Bluetooth® devices is not recommended due to the significant latency that it can introduce.
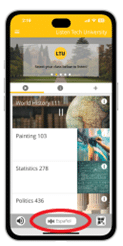
QR Code Scanner:
The ListenWIFI mobile app has a built in QR code scanner, allowing users to access a channel directly by opening their camera and scanning a ListenWIFI channel access QR code. The in-app QR code scanner is accessible via the bottom of the app to the right (see image). QR codes can be generated for each channel directly in the ListenWIFI Manager software. See ListenWIFI Manager section for details on creating QR codes.

Language Selection:
The language can be changed (when available) at any time by tapping on the language selector at the bottom of the mobile app. All available languages for the current channel will be displayed and made available for selection. Once set, the mobile app will stream audio channels in this language when available. See Servers section for Multi-Lingual audio setup.
Loudspeaker Mode:
The ListenWIFI app features a loudspeaker mode (disabled by default), routing the audio to the phones loudspeakers and allowing the audio to be amplified for listening without headphones. By default, this feature is turned off and the ListenWIFI mobile app audio can be heard by directly holding the smartphone up to the ear and listening via the phone call speaker.
Alternatively, headphones can be directly connected to the headphone or USB-C jack, which will override the audio coming from the phone’s speakers.
Tip: When using headphones with ListenWIFI, it is recommended that wired headphones be used to ensure low audio delay when lip sync is important. The use of Bluetooth® devices is not recommended due to the significant latency they can introduce.
Customizable App
The ListenWIFI Mobile App supports customized content and venue branding. The following assets can be customized using the ListenWIFI Manager Software by simply pointing and clicking on the individual items and specifying the content:

- Welcome Screen – Upon app launch and successful connection to Wi-Fi Audio Servers on the network, a welcome screen can optionally be shown to mobile app users (disabled by default). The welcome screen can support images (JPG, PNG) or videos (MP4) up to 5MB in size. Additionally, an optional skip feature can be enabled allowing users to skip the welcome screen after a specified duration (3 seconds to 30 seconds).
- App Theme – The app title can be customized allowing the venue to place a custom name at the top of the app. Also, the primary and secondary colors of the app can be modified using a color palette or by specifying HEX or RGBA color values.
- Sliding Banners – The mobile app can display up to six sliding banners, which are on rotation towards the top of the app. These sliding banners are clickable images, allowing the user to click-through the banner to additional content including supporting images and text, as well as a link to a “More Info” button which points to a specified website URL.
- Channel Images – Small channel images are shown when viewing a channel, while large channel images are shown when streaming audio. These channel images can be customized to match the channel name, room, topic, etc.
- Info– The second tab in the app supports up to six PDF documents, up to 5MB in size. The info tab can be used to upload important information about the venue, calendars, maps, schedules, etc. These PDF documents can also be placed in custom categories and ordered as needed.
- Offers – The 3rd tab in the app supports up to six offers, which can be used to highlight specific offers or events. Each offer has a dedicated space within the mobile app that users can quickly and easily find, including a custom title with supporting images. Additionally, when the user clicks on the Offer, they can be shown additional content and link to an external website by specifying a custom URL.
Once customized, the ListenWIFI mobile apps will automatically show the specified content upon successful connection to the Wi-Fi Audio Server(s) on the network. Please note that the app does not show this customized content until it has successfully connected to a server on the network.
Using Beacons with ListenWIFI Mobile App
Mobile Apps are capable of automatically triggering to a specified channel when they receive a signal from Listen beacons. By installing beacons in individual rooms or zones, users are automatically connected to the audio for that specific room without any user interaction, providing a completely automated experience. These Listen beacons emit a Bluetooth Low Energy (BLE) signal that the mobile device can pick up, enabling the app to automatically change its channel based on the channel specified.
By adding beacons to the venue in the Manager software, all beacons become available for mobile apps to trigger from and are listed under the Beacons tab of the Receivers page. Simply check the Beacon that you want mobile apps to respond to, and then specify the audio channel that they should play by selecting a channel from the list of available channels. Please note that the range and responsiveness of the beacon can be changed by adjusting the power level of the beacon under the Beacons section of the ListenWIFI Manager software (see Beacons section for more details).
In addition to specifying what channel mobile apps shall trigger to when they encounter a beacon, you can also specify what should happen when the mobile device leaves the range of the beacon; audio can continue streaming until another beacon is encountered, OR the app can be disconnected from the audio channel as soon as it leaves the range of the Beacon. This behavior is specified by the Exit Timeout feature.
Exit Timeout: This feature defines whether the app should remain connected to the audio channel or disconnect once they leave the range or area of the beacon. Exit Timeout is disabled by default, allowing mobile apps to continue streaming audio until another beacon is encountered. When Exit Timeout is enabled, users will automatically be disconnected from this channel when they leave the range of beacon. A value can be set allowing you to specify the time a user can remain connected once they leave the range of the beacon, from 10 seconds up to 10 minutes. It is important to note that if Exit Timeout is enabled, the user will lose access to the audio unless they remain within the range of the beacon, requiring the entire room or space to be properly covered with the beacon signal (see Beacons section and footprint).
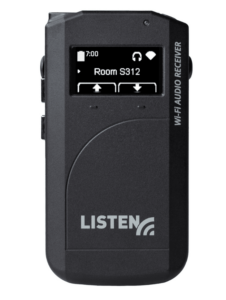
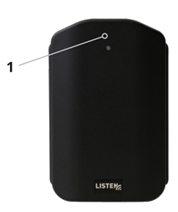
WiFi Audio Receivers
Quick Reference:
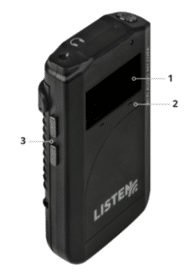
- OLED Display Area: Displays status including channel playing, available channels, volume level, Wi-Fi strength, connection status, language selection, profile name, battery level with time remaining, charge status, and unit ID.
- Soft Buttons: Use the left and right soft keys to navigate channel and language selections.
- Volume Buttons: Momentarily press to adjust listening volume up or down.
- Power Button: Press power button for 1 second to turn on receiver, 3 seconds to turn off receiver.
- LED: Indicates status. Flashing green = charging, Solid green = charged, Flashing red = requires software configuration, Flashing blue = receiver is booting up.
- Headset: Headphone jack to connect wired ear speaker, headphone, neck loop, or any 3.5mm CTIA compliant listening device.
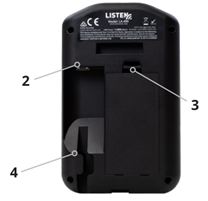
- Lanyard Clip: Attach a lanyard to the receiver to hang the device from the neck (LA-445 sold separately).
- Belt Clip: Clip to attach the receiver to a belt or pocket. Removable and reversible.
- Battery Access. Press the button and slide down back panel to access the battery for removal and/or replacement.
- Micro USB. Supports charging and configuration via micro-USB when not using the Listen Docking Stations (sold separately).
Charging:
Fully charge the receivers battery using one of the following options:
- Place the receiver in an available Listen Docking Station:
- LA-480 – Docking Station 16
- LA-481 – Docking Station Case 16
- LA-482 – Docking Station
2. Connect a USB charger to the micro-USB port on the side of the receiver.
The receiver will typically charge in about 2-3 hours. For completely dead batteries, it may be required to leave the receiver connected to a charger for up to 4 hours. Note that the receiver can be used while charging but will extend charging time.
Operational Instructions:
Prior to use, receivers must first be added and configured via the ListenWIFI Manager software. This step is required for the receivers to establish communication with the Wi-Fi network and communication with the Wi-Fi Audio Servers on the network. Once added, the receivers will connect and begin streaming real time audio. See Setup section.
1. Remove the receiver from the charger and turn the receiver on.
2. Plug in wired headphones to listen, or an inductive neck loop for use with hearing aids equipped with a T-Coil.
3. Allow receiver to connect to the specified Wi-Fi network. The display will indicate a successful connection, and the Wi-Fi icon will indicate signal strength.
4. Allow the receiver to connect to all Wi-Fi Audio Servers on the network.
5. Audio channels are then accessed depending on channel configuration:
- Visible Channels: Channels are always visible on the receiver and accessible to the user. Channels are manually selected from the available channel list. Simply use the soft buttons to navigate the channel list up and down to select the channel and the audio will begin playing immediately.
- Hidden Channels: Channels are hidden from view on the receiver and require the user to be in a specific location, using Listen beacons. Channels are made available on the receiver when in range of a beacon and then become unavailable when the receiver leaves the range of the beacon. The receiver will only have access to 1 hidden channel at a time. When a user enters a specific room or zone, the channel will automatically appear on the receiver display and begin playing. When the user leaves the area or enters another beacon zone, that channel can also be removed from the display (configurable).
- Hidden and Visible Combination: Some channels are always visible and available for selection, while others require that the user be in proximity to a beacon for access. Channel configuration is available in the Servers Mixer section of the Manager software. When using Hidden channels and beacons with the receiver, subscription to those beacons is required, which can be configured in the Receivers beacon section of the Manager software.
6. Adjust the volume to a comfortable listening level using the side volume buttons.
7. The language can also be changed (when available) by pressing the right soft button for 3 seconds, navigating the list using the up/down side buttons, and confirming with the right soft button.
8. Once done listening, turn off the receiver by pressing the power button for 3 seconds.
9. Return receiver to the charger.
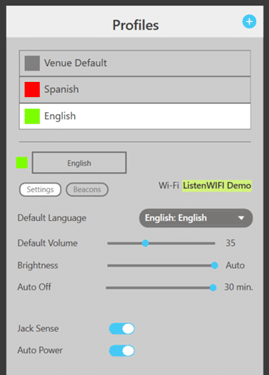
Receiver Profiles
Receiver settings are managed via “Profiles”, which are simply a group of settings that will define how the receiver will behave in a venue. Receiver profiles are accessible via the Receiver page in the ListenWIFI Manager software only. Each profile includes the Settings tab and the Beacons tab, allowing you to specify preferences such as default language, display brightness, etc., as well as specify which channels the receiver shall trigger to when it encounters specific beacons (for venues using beacons). Receivers can be managed individually or as a group using the profiles setup. You can create as many profiles as you like, creating unique experiences for different users or events. Once profiles are created, you can simply drag and drop a profile onto a receiver in the Manager software to load that profile or specific user experience to a receiver.
Wi-Fi Credentials
The assigned Wi-Fi network and credentials are specified on the Venue page in the ListenWIFI Manager software. Once the Wi-Fi network is specified for a venue, the Wi-Fi credentials will be shared with all receivers that have been added to the venue. There is no need to program the Wi-Fi credentials into each receiver individually.
Receivers Settings:
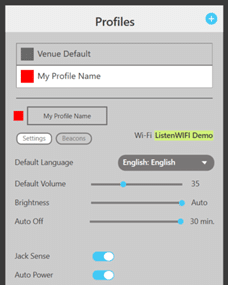
1. Default Language: For multi-lingual venues a default language can be set. The receiver will stream this language whenever that language is available for a specific channel. If there is not more than one language, then the receiver will simply play the available channel in its floor language. In the case where alternate languages are available, but not the language specified by the receiver, it will fall back to the language at the top of the channel list as specified under Server channels in the Manager. The language can also be temporarily changed directly on the receiver by long pressing the right soft button to access the language menu and using the side buttons to navigate to a different language available. The receiver will return to its programmed default language upon a power cycle or insertion into the docking station.
2. Default Volume: The default listening volume can be adjusted from 0 to 100%, allowing venues to properly set the default volume based on the application, channel levels, ambient noise levels, listening audience, etc. The default volume is set to 35% by default.
3. Brightness: The brightness of the OLED display can be adjusted as follows:
- Off – the display will not illuminate at all unless the status button is pressed.
- Dim – the display will be dimmer for dark environments.
- Bright – the display will be bright for brighter environments.
- Auto (default) – the display will adjust itself based on the ambient lighting conditions.
4. Auto Off: This power saving mode is enabled by default, where the receiver will automatically power off after a duration of audio silence. The power off interval can be adjusted from 10-30 minutes or disabled. This feature is set to 30 minutes by default.
5. Jack Sense: The receiver will automatically power on when headphones or ear speakers are plugged into the headphone jack. Also, the receiver will turn off after 60 seconds of headphone removal. This feature is enabled by default and can be disabled.
6. Auto Power: The receiver will automatically turn on when removed from the charger and turn off when connected to a charger. This feature is enabled by default but can be disabled.
Using Beacons with Receivers:
Receivers are capable of automatically triggering to a specified channel when they receive a signal from Listen beacons. By installing beacons in individual rooms or zones, users are automatically connected to the audio for that specific room without any user interaction, providing a completely automated experience. These Listen beacons emit an Infrared (IR) signal that the receivers can pick up, allowing the receiver to automatically change its channel based on its assigned receiver profile which specifies a channel for each assigned beacon.
By adding beacons to the venue in the Manager software, all beacons become available for receivers to trigger from and are listed under the Beacons tab of the Receivers page. Simply check the Beacon that you want the receiver(s) to respond to, and then specify the audio channel that the receiver should play by selecting a channel from the list of available channels. This configuration can then be saved as part of a receiver profile, enabling any receiver with this profile to automatically trigger when in range of the beacon. Please note that the range and responsiveness of the beacon can be changed by adjusting the power level of the beacon under the Beacons section of the ListenWIFI Manager software (see Beacons section for more details).
In addition to specifying what channel the receiver shall trigger to when it encounters a beacon, you can also specify what should happen when the receiver leaves the range of the beacon; the receiver can continue streaming the audio channel until it encounters another beacon, OR it can disconnect from the stream as soon as it leaves the range of the Beacon. This behavior is specified by the Exit Timeout feature.
Exit Timeout: This feature defines whether receivers should remain connected to the audio channel or disconnect once they leave the range or area of the beacon. Exit Timeout is disabled by default, allowing the receiver to continue streaming the audio channel until it encounters the next beacon. When Exit Timeout is enabled, users will automatically be disconnected from this channel when they leave the range of beacon. A value can be set allowing you to specify the time a user can remain connected once they leave the range of the beacon, from 10 seconds up to 10 minutes. It is important to note that if Exit Timeout is enabled, the user will lose access to the audio unless they remain within the range of the beacon, requiring the entire room or space to be properly covered with the beacon signal (see Beacons section and footprint).
Unit Menu: The receiver’s main menu can be accessed as follows:
1. Press and hold the power and volume down buttons simultaneously for 2 seconds.
2. Using the volume buttons, navigate up and down throughout the menu.
3. Select one of the following menu items by pressing the right soft key:
- Reset Device: Reset the unit to factory defaults by confirming with the right soft key.
- About: Displays the receiver’s information – Model, Serial Number (S/N), Firmware Version, Region Code, SSID, IP address, FCC ID, IC ID, and MAC address.
The unit menu can be exited at any time by momentarily pressing the left soft key or power button. Alternatively, the unit menu will automatically exit after 10 seconds of no activity.
Beacons
Quick Reference:
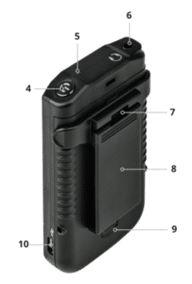
1. Status LED – Displays status of beacon when powered.
Flashes blue once every 5 seconds during normal operation indicating unit is successfully emitting either a Bluetooth (BT) or Infrared (IR) signal. (Can be disabled)
Flashes Red once every 5 seconds when batteries are low and need to be replaced. (Can be disabled)
Flashes green once per second when connected to the ListenWIFI Manager software for programming.
Flashes Yellow and Red once per second during firmware updates and reset commands.
2. Micro USB Connector – Allows the device to be powered directly via USB cable. Also allows for programming when connected via USB cable to a PC with ListenWIFI Manager software running.
3. Battery Access Door – Allows access to the battery compartment where 2 AA alkaline batteries can be installed for operation without dedicated USB supply.
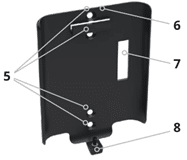
4. Cable Routing Trough – Eliminates the cable from coming unplugged or applying stress on the USB connector. Can be used when routing the cable down the wall instead of through the cable access hole (7) for entry directly into a wall box.
5. Mounting Holes – These holes allow mounting directly to a wall or single gang electrical box. Outside holes are designed for North American electrical boxes, and inside holes are intended for European style electrical boxes.
6. Retaining Tab – Protrusion on the mounting bracket, allowing the beacon to connect and be retained to the mounting bracket securely.
7. Cable Access – Cutout in the mounting bracket allowing the USB cable to be routed directly into the wall or electrical box behind the beacon mounting bracket.
8. Locking Screw – Hex screw locks beacon into the mounting bracket to resist tamper.
Beacon Overview
Beacons provide an automated listening experience by connecting mobile apps and/or receivers to the proper audio channel based on their physical location. By simply installing beacons in different rooms or areas, users are automatically connected to the right audio channel for that area when in range of the beacon, and optionally disconnect when they leave the range of the beacon. Beacons simply broadcast a small amount of data that, when in range, the receivers and/or mobile apps use to determine which channel they should be streaming. Listening devices simply use the information from the beacons to make a channel change according to how listening devices have been configured to react. Beacons are programmed to be used with mobile apps only, receivers only, or both mobile apps and receivers depending on the preference of the venue.
Beacons are advantageous for any application that has multiple channels available for different spaces. They provide privacy at a venue by ensuring users are connected to the proper audio channel, while also prohibiting access to other audio channels from adjacent rooms or spaces. Instead of relying on channel password authentication to meet privacy concerns, beacons can eliminate the need for passwords by providing physical authentication where the listener must physically be in the room to access the audio. Additionally, instead of forcing users to select from a list of available channels in the app, beacons allow channels to be hidden by default and then made available when in the range of the beacon. Also, beacons offer advantages over providing QR codes for channel access, as QR codes are not automated, must be scanned, and can introduce security concerns. Beacons provide an elegant and automated user experience that solves these concerns for many applications.
Beacon Setup
Prior to use, beacons must first be added to a venue in the ListenWIFI Manager software. This can be accomplished by connecting the beacon via USB into the PC with ListenWIFI Manager software, in which case the beacon will automatically be added to the venue. Alternatively, the beacon can be discovered and added wirelessly from the Manager software via Bluetooth.
Once added, the beacons can then be configured as desired according to the settings described below. Once configured, mobile apps and receivers can then be programmed to trigger from these beacons.
1. Bluetooth Triggering – Enables a Bluetooth beacon transmission allowing mobile devices to receive the beacon. Can be enabled or disabled (default enabled).
2. Bluetooth Power – Adjust the effective range of the beacon for mobile devices. Can be set to Low, Medium, or High (see Beacon Range table).
3. Infrared Triggering – Enables an Infrared beacon transmission allowing Wi-Fi Audio Receivers to receive the beacon. Can be enabled or disabled (default disabled).
4. Infrared Power – Adjust the effective range of the beacon for receivers. Can be set to Low, Medium, or High (see Beacon Range table).
5. Transmit Interval – Adjusts how often the beacon signal is broadcast. Adjustable from 300mS up to 5 seconds (default 1 second). A faster interval allows for a more responsive trigger from listening devices but increases the power consumption.
6. LED Indicators – Enable/disable the blue status LED flash every 5 seconds shown during normal operation. Default is enabled.
7. Low Battery LED – Enable/disable the red status LED flash every 5 seconds shown when batteries are low. Default is enabled.
8. OTA Configuration – Enable/disable the over-the-air (OTA) connection method for configuration. When disabled, the device cannot be connected to via Bluetooth for configuration and must be directly connected via USB.
Powering Beacons
Beacons can be powered via a direct USB micro connection or by installing 2 AA alkaline batteries. Direct USB power is recommended whenever possible. USB power can be routed directly into a single gang electrical box via the cable access cutout in the mounting bracket or routed directly down the wall to an outlet via the integrated cable trough. If using batteries, please reference the beacon battery life section. It is important to note that battery powered beacons will operate at a maximum level of medium power when infrared triggering mode is enabled.
Beacon Installation
Beacons can be mounted to a wall or to a ceiling directly to a single gang electrical box, or directly attached to sheetrock or flat surface with the mounting bracket and screws provided. It is recommended that beacons be installed central to the listening area, as much as possible. Generally, the main thing is to ensure that all users in a room or zone are within range of this beacon and the beacon signal is stronger than any other beacons installed at the facility. This ensures that listening devices are triggered to the correct channel for that space, and users are not falsely triggered to alternate rooms or channels. This is often best accomplished by ensuring that the beacon is placed in a central location with adequate coverage of the room or zone.
Beacon Range
The range of the beacon is dependent upon many factors, including transmission mode (IR or BT), number of walls and obstructions, signal bounce, body attenuation, listening device sensitivity, etc. It is important to keep this in mind during design and installation of these beacons and error on the safe side to ensure adequate coverage. Multiple beacons can be used to extend the range or footprint of the beacon signals.
The following table lists typical line of sight range values for each transmission mode at the 3 different power levels available:
Power Level | Low | Med | High |
Infrared (IR) | 10 feet (3 meters) | 30 feet (9 meters) | 110 feet (33 meters)* |
Bluetooth (BT) | 10 feet (3 meters) | 30 feet (9 meters) | 110 feet (33 meters) |
*Requires direct USB power, battery power will operate at Medium
The range of the beacon will be dependent upon environmental conditions and listening device sensitivity, especially with Bluetooth (BT). It is essential to tailor your design approach based on specific requirements and environmental conditions. Multiple beacons can be used to extend the range or footprint of the beacon signals in larger areas. Some experimentation may be required to choose the optimal beacon locations.
Beacon Battery Life
Beacons can operate using 2 AA alkaline batteries when needed. The use of batteries is generally only recommended for temporary deployments at venues, or when flexibility and movement of beacons is required such as during experimentation with beacon placement. If using batteries in a permanent installed environment, a scheduled battery replacement plan should be implemented.
Battery life is largely dependent upon the triggering protocols enabled, as well as the transmit power and interval. Bluetooth consumes very little power, while Infrared consumes more power. The tables below highlight the expected battery life for each mode of operation across a few different configurations.
Bluetooth Triggering | Transmit Interval | ||
.3 second | 1 second | 5 second | |
Low, Medium, High power | 6 months | 9 months | 12 months |
Infrared Triggering | Transmit Interval | ||
.3 second | 1 second | 5 second | |
Low power | 7 weeks | 12 weeks | 22 weeks |
Medium power | 3 weeks | 7 weeks (default) | 16 weeks |
High power | Requires USB power | ||
When using both Bluetooth and Infrared modes simultaneously, the Infrared Triggering battery life table should be referenced. Battery life is calculated using new alkaline batteries to the time where the beacon is flashing low battery LED. Once the beacon indicates low battery, it is recommended to replace the batteries as soon as possible to avoid a range reduction from the beacon.
ListenWIFI Manager Software

Overview
The ListenWIFI Manager software is a comprehensive setup and management tool for Windows®, designed for the configuration and management of all ListenWIFI system components, including servers, mobile apps, receivers, and beacons. This authentication-based software ensures that all ListenWIFI components are securely added and linked to a primary owner’s account. This provides robust security and ownership, preventing unauthorized access and tampering with system configurations. Only the owner’s account can access the system hardware configurations, ensuring a tamper-proof and secure environment.
The Manager offers a user-friendly interface to access, configure, deploy, and manage all ListenWIFI equipment at a venue. It supports a wide range of functions and equipment configurations, including channel naming and gain adjustments, channel visibility and access controls, channel routing, mobile app customizations, beacon automations, QR code generation, firmware updates, inventory management, and more.
Minimum Specifications
The ListenWIFI Manager can be installed on Windows machines that meet the following requirements:
- Supported Operating Systems:
- Windows 11
- Minimum Requirements:
- .NET Framework of version 6.0 or higher
- Processor: 1 GHz or faster
- RAM: 2 GB or more
- Disk Space: 1000 MB of available space
Setting up the ListenWIFI Manager
1. Manager Download
To gain access to the Manager software, visit www.listentech.com and navigate to the ‘ListenWIFI Support’ page. From this page, select ‘Request ListenWIFI Manager Software’. Simply fill out the form and a download link will be provided.
2. Manager Installation
The software should be installed on a central computer that has access to the same local area network where ListenWIFI will be deployed, either via a wired or wireless connection (wired recommended). The software can also be installed on a virtual machine on the network, allowing multiple users to access the software from their personal computers. The software should be accessible by administrators who are involved with configuration and deployment of ListenWIFI, and optionally to venue personnel who may need continued access for day-to-day operations and inventory management. It is important to note that the software is only required for initial setup and deployment and is not required to be continuously open or running once configured.
Creating Accounts
Upon opening the software, you will be prompted to create an account. This includes specifying your login credentials such as username and password, as well as setting up security questions and answers in case your password is forgotten. This account is referred to as the ‘Owner’ account and is the main ListenWIFI Manager account.
Owner Account: The Owner Account provides full administrative access to all ListenWIFI components within the Manager software on the installed computer. Logging into the Owner Account is crucial for discovering and configuring ListenWIFI components at the venue. Once components are discovered and added to this account, they become exclusively associated with the Owner Account. This ensures that owned equipment cannot be added or discovered via other accounts or computers, thereby preventing tampering of system settings and ensuring the security of all system components. One Owner account is allowed per ListenWIFI venue and installation.
Ownership transfers are facilitated by providing a Venue Key to another user, allowing a new owner to import all system components of the venue to their account in another ListenWIFI Manager installation. See ‘Creating and Managing Venues’ section for additional details.
Operator Account: Operator accounts provide access to specific sections of the ListenWIFI Manager, allowing operators to manage the system day-to-day once system configuration is complete by the Owner. These accounts only have access to the Checkout page for inventory management and the Mobile App page for branding customization. Operator accounts do not have access to other pages or broader system configurations available to the Owner account.
Operator accounts are created by and associated to the Owner account as follows:
1. Open the Owner Account profile window by clicking on the profile icon in the top right of the Manager software.
2. Click the + icon next to ‘Manage Operators”
3. Enter the name and email address for the desired operator’s account. Once complete, a blue + icon will appear to the right of the email address.
4. Click the + icon to save changes and add the operator. A temporary password is provided to be communicated to the Operator.
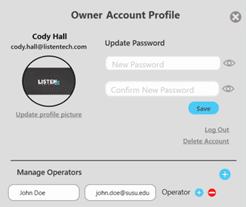
Operator accounts can be removed by clicking on the – icon to remove the user.
Creating and Managing Venues
A Venue is a collection of ListenWIFI system components in the Manager software, intended to function together as a cohesive system on a specific network. System components are added and associated to the selected venue under the owner’s account. A venue consists of the following items being added, specified, and/or customized:
- Wi-Fi Network (assign)
- Wi-Fi Audio Servers (add)
- Beacons (add)
- Wi-Fi Audio Receivers (add)
- Mobile Apps (customize)
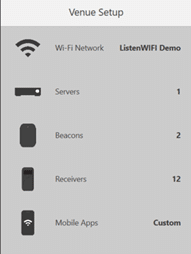
Venue Setup
The Venue Setup section guides you through setting up the venue, beginning with the assignment of a Wi-Fi network. Once the Wi-Fi network is specified on the Venue page, you can add and configure all components by visiting the respective pages for each ListenWIFI system component. Simply click on the component images in the Venue Setup section to navigate to their individual pages and add them to your venue.
As you add components, the Venue Setup section will automatically summarize the quantity and status of each component within the venue.
Naming your Venue
Upon creation, venues are automatically assigned a default name. You can modify this name and give it a friendly name by clicking on the pencil icon to edit the name.
Assign the Wi-Fi Network
To deploy ListenWiFi at your venue, start by specifying a wireless network on the Venue page:
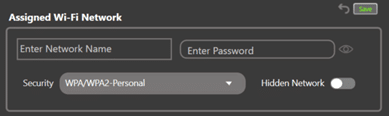
1. Enter Network Details: In the “Assigned Wi-Fi Network” section, input the SSID, security type, and password.
2. Select from Available Networks: For convenience, a list of available wireless networks is provided below. Click on the desired network to automatically fill in the Network Name (SSID) field.
3. Save the Network: Enter the password and save the wireless network to your venue.
This assigned Wi-Fi network will be used by all receivers added to the venue, as well as to create a Network QR Code for mobile app users.
Network QR Code
Once the Wi-Fi network has been saved to the venue, a Network QR code is automatically generated on the Venue page. To print this QR code:
1. Click on the “Print Network QR Code” button. ![]()
2. Use the Windows printer dialogue box to properly size and print the QR code.
This QR code can be provided to mobile app users, allowing them to scan it with their smartphones to connect to the wireless network where ListenWIFI will be accessed.
Managing Multiple Venues
The ListenWIFI Manager allows you to manage multiple venues from a single installation, making it easy to oversee various individual sites running ListenWIFI.
- First Venue Creation: The first venue is automatically created upon your first login.
- Adding New Venues: To create additional venues, click on the “+ Add new venue” option at the bottom left of the Venue page.
- Switching Between Venues: You can select and toggle between venues using the venue selection drop-down at the top of the page.
- Deleting a Venue: To delete a venue, click on the “—” icon within the venue selector at the top of the page.
Importing an Existing Venue
Venues are initially owned and associated with the original owner’s account (refer to the ‘Creating Accounts’ section). If ownership needs to be transferred to another account or computer, the venue can be imported using the Venue Key, a unique identifier for each venue.
To transfer ownership:
1. Locate the Venue Key on the Venue page. 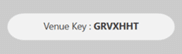
2. Provide the Venue Key to the new account holder.
3. The new account holder can import the venue by selecting the “Import an Existing Venue” option at the bottom left of the Venue page.
Please note, the Venue Key will automatically regenerate after a successful venue transfer.
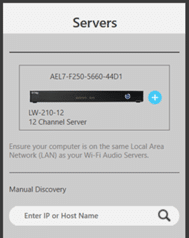
Adding and Managing Servers
Server Discovery: From the Servers page, discover and add Wi-Fi Audio Server(s) to your venue. The ListenWIFI Audio Server(s) should be powered on and connected to the same local area network as your computer running ListenWIFI.
- Servers are discovered automatically on the network and can be added to the venue by clicking on the blue add icon.
- If your server(s) are not automatically discovered, it is possible that your network may block the automatic discovery protocol (mDNS). In this case, you will need to manually enter the IP address of the server in the manual discovery section and click the search icon. Once found, click on the blue add icon to add it to the venue.
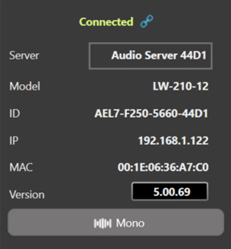
Connection Status: An active connection with ALL venue servers is required to make changes to a venue. The Manager indicates this connection status with all servers globally at the top of the page, showing either “Connected” or “Disconnected”.
![]()
If the venue is reported as being Disconnected, ensure your computer is on the same local area network as the server(s). Also, make sure that all servers are powered on and connected to the network. Once a venue is configured and changes are saved to all servers, the Manager does not need to remain connected and does not need to be open during use.
Server Information
Simply click on any added server to open the server detail’s view. The server detail’s view provides the following:
- Server: The default server name which is only seen in the Manager. Edit to give your server a friendly and identifiable name.
- Model: The specific SKU of the server, including the channel count extension
- ID: A unique 16-digit server ID
- IP: The IPv4 address of the server on the network
- MAC: The unique static MAC address of the server on the network
- Version: The current firmware version installed on the server. Simply click on the button to check for and install available updates.
- Mono/Stereo: The current input/channel configuration of the server. Simply click on the button to toggle between mono and stereo operation. Stereo uses 2 channel outputs to accommodate independent left and right audio channels.
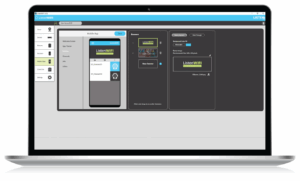
Mixer Configuration
Click on a server to open the server Mixer tab, which provides access to all channel configuration options:
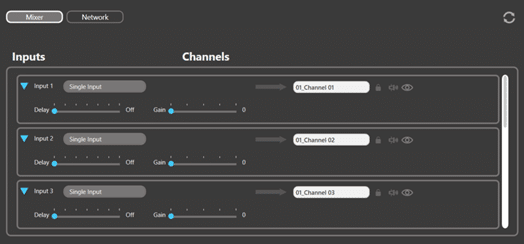
Each audio input is associated to a specific channel to be streamed over the local area network to listening devices, including mobile phones and W-Fi audio receivers. Each audio channel has the following configuration options available:
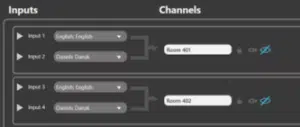
Channel Name: Name each channel as desired which will be displayed on listening devices.
Channel Visibility: Click on the eye icon to set channels to Hidden status (default is visible). When a channel is set to Hidden, it will not be available or displayed on listening devices for manual selection, instead requiring a trigger to access the channel. This trigger can occur using either beacons (automated access) or QR codes (manual access).
Channel Password: Click on the padlock icon to Password or PIN protect each channel. When a channel is password/PIN protected, users will be required to input this password/PIN to access the channel. The password/PIN protection can be applied to mobile apps only (where receivers automatically gain access), or to both mobile apps and receivers. The specified Password/PIN will need to be communicated to ListenWIFI users who need to access the channel(s).
PA Output: Click on the announcement icon to assign a Public Address (PA) channel for the venue. When a PA channel is set, any audio detected on the associated input will temporarily be routed to all other channels for the duration of the audio presence. Note that only one PA channel can be set per venue across all servers.
Input Gain: Adjust the gain of each input as needed for proper level control. Gain can be applied on each input in 6dB increments, up to a maximum of 24 dB of gain.
Input Delay: Adjust the delay of each input as needed for proper alignment of audio to other sources, such as ambient sound, loudspeakers, video displays, etc. Delay can be applied to each input up to a maximum of 3 seconds of delay.
Unused Inputs: If you have extra channels that will not be used, simply drag and drop the channel inputs to the bottom of the screen to the “Unused Inputs” section. This will disable those channels within the server, making them unavailable for listening purposes. Channels can be reenabled at any time.
Multilingual Channels
For rooms or spaces where multiple languages need to be made available, multiple inputs can be associated to the same output channel. Simply drag and drop inputs onto a channel and then specify a language for each input using the drop-down selector.
When accessing a multi-lingual channel, users will see a list of available languages to choose from. By utilizing the built-in language selector on both the mobile app and the Wi-Fi audio receiver, users can select any of the provided languages. The channel will automatically play in the user’s preferred language, based on the current language setting on their mobile app or receiver.
Network Configuration
Click on a server to open the server Network tab, which provides access to all network configuration options within the server:
The ListenWIFI server is by default configured as a DHCP client, which means it will receive an IP address, subnet mask, gateway, and Domain Name Server (DNS) address automatically from the network it is plugged into. If it is desired to configure the IPV4 settings directly on the server, click on the Servers page in the Manager software, click on the server and select the Network tab to specify these IPV4 settings (see image).
ListenWIFI audio packets are prioritized over other network traffic using Quality of Service (QoS) to ensure that ListenWIFI audio streams are sent over the network as quickly as possible, high priority, to ensure low latency for live audio applications. ListenWIFI audio packets are prioritized using a Type of Service (TOS) or Differentiated Services (DS) field, which is set to “0xB8” by default. This field can be changed as needed depending on the network by editing the TOS/DS field. Typical values are 0xD8 or 0xB8 depending on the local network. Some experimentation may be required to choose the optimal value.
Additionally, the priority of the network traffic can be set based on the VLAN priority of either Voice or Video. The default value of “Voice” is recommended but can be changed to Video if it provides a better experience on your network with lower latency and less dropouts. Some experimentation may be required to choose the optimal value.
Adding and Managing Beacons
Adding Beacons
Beacons must first be added to a ListenWIFI venue in the Manager before they can be configured. Beacons can be added in one of 2 ways:
- USB Connection (recommended): Simply plug in the beacon to the Manager computer. The beacon will automatically be added to the venue.
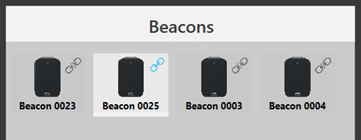
- Bluetooth Connection: With Bluetooth enabled on the Manager PC, powered-on beacons within range can be discovered wirelessly. These beacons will appear at the bottom of the beacon section, marked with a blue “+” icon if they are available to be added to a venue (i.e., not already owned or associated with another venue). To add an available beacon to the venue, simply click the blue “+” icon next to it.
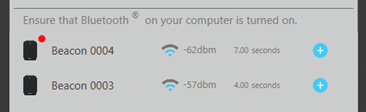
Beacon Connection
To connect to an added beacon for configuration, simply click on it. If the beacon is connected via USB, configuration options will appear immediately. If the beacon is not connected via USB, the Manager PC will attempt to establish communication with the beacon via Bluetooth. Once connected, the beacon information and configuration parameters will be shown to the right.
Beacon Information
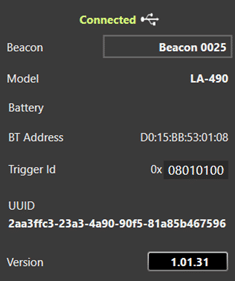
Click on any added beacon to open the beacon detail’s view. The beacon detail’s view provides the following:
- Beacon: The default beacon name which is only seen in the Manager. Edit to give your beacon a friendly and identifiable name.
- Model: The specific SKU of the server, including the channel count extension
- Battery: Indicates the current battery level when using batteries.
- BT Address: A unique Bluetooth device address assigned to each beacon.
- Trigger ID: A unique identifier used to distinguish between different beacons and triggers.
- Version: The current firmware version installed on the beacon. Simply click on the button to check for and install available updates.
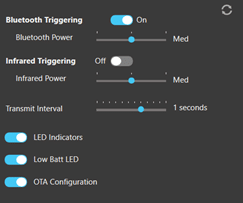
Beacon Configuration:
The following configuration parameters can be adjusted for each beacon:
- Bluetooth Triggering – Enables a Bluetooth beacon transmission allowing mobile devices to receive the beacon. Can be enabled or disabled (default enabled).
- Bluetooth Power – Adjust the effective range of the beacon for mobile devices. Can be set to Low, Medium, or High (see Beacon Range table).
- Infrared Triggering – Enables an Infrared beacon transmission allowing Wi-Fi Audio Receivers to receive the beacon. Can be enabled or disabled (default disabled).
- Infrared Power – Adjust the effective range of the beacon for receivers. Can be set to Low, Medium, or High (see Beacon Range table).
- Transmit Interval – Adjusts how often the beacon signal is broadcast. Adjustable from 300mS up to 5 seconds (default 1 second). A faster interval allows for a more responsive trigger from listening devices but increases the power consumption.
- LED Indicators – Enable/disable the blue status LED flash every 5 seconds shown during normal operation. Default is enabled.
- Low Battery LED – Enable/disable the red status LED flash every 5 seconds shown when batteries are low. Default is enabled.
- OTA Configuration – Enable/disable the over-the-air (OTA) connection method for configuration. When disabled, the device cannot be connected to via Bluetooth for configuration and must be directly connected via USB.
Adding and Managing Receivers
Adding Receivers
Prior to use, receivers must first be plugged into the Manager PC where they are automatically added to the ListenWIFI venue. Receivers can be plugged into the Manager PC using either a direct USB cable, or via a ListenWIFI Docking Station. Once added to the venue, receivers are automatically provided with the Wi-Fi Network credentials for that venue and given the “Venue Default” profile.
Receiver Inventory
All receivers added to the venue will be displayed in the Manager software, regardless of their current connection or power status. The Manager software categorizes all venue receivers into the following states:
- Docked: Receivers connected via a docking station.
- Connected: Receivers that are powered on and connected to the Wi-Fi network, including those connected via USB.
- Disconnected: Receivers that are powered off or disconnected from the Wi-Fi network.”
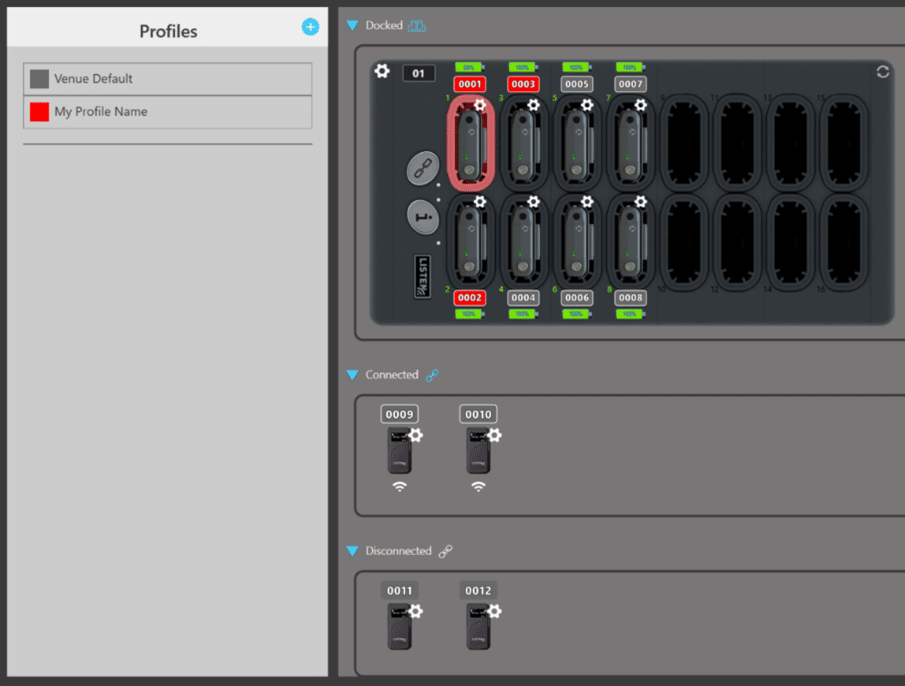
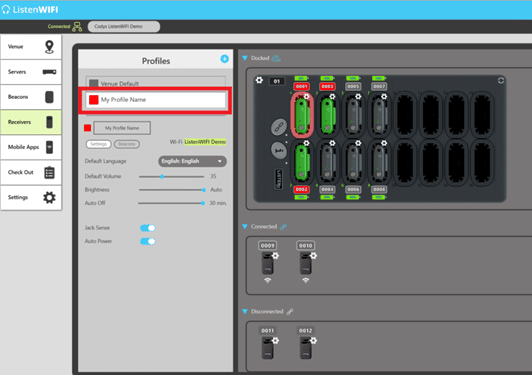
Receiver Profiles
Receiver profiles are collections of settings that can be saved and loaded into receivers. This feature allows you to create and manage multiple profiles, enabling quick changes to receiver settings based on the desired user experience or specific events. Profiles can be applied to individual receivers or groups, providing flexibility and ease of management.
By default, all newly added receivers will be assigned to the ‘Venue Default’ profile but can be reassigned to a different profile at any time.
Profiles can be selected from the Receiver page by clicking on the profile name towards the top. When a profile is selected, it will highlight all receivers assigned to that profile. Additionally, clicking on any individual receiver will automatically select that profile and all assigned units. This allows receiver settings to be easily managed as part of their group, without needing to apply individual changes, providing ease of receiver management.
Creating Profiles:
To create a new profile, follow these steps:
1. Click on the “Create New Profile” icon.
2. Assign a friendly name to your profile. This name will be displayed on the receiver’s home screen during bootup and operation.
3. Select a color for the profile by using the color selector. Colors help quickly identify different profiles.
4. Set unit preferences for the profile from the Settings
5. Configure automations for the profile from the Beacons
Profile Configuration
Each profile includes configuration options that can be customized as follows:
Profile Name ![]()
Assign a user-friendly name to a profile by modifying the default name. This makes it easy to identify in the Manager software and directly on the receiver’s display. The receiver shows the profile name when connected to the docking station or USB power, during bootup, and when the display is first turned on.
Profile Color
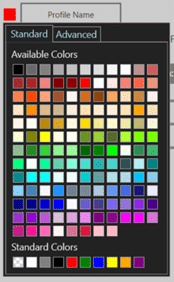
Set a unique color for your profile by clicking on the colored square next to the profile name. Each receiver assigned to this profile will be shown in this color for easy tracking and management within the Manager software.
Settings Tab ![]()
- Wi-Fi Network: The Wi-Fi network assigned on the Venue page is automatically applied to all profiles. To update, click on the Wi-Fi name to be taken to the Venue page.
- Default Language:Set a default language for receivers when multiple languages are available for one or more channels.
- Default Volume:Set the default listening volume for when receivers power on. This can be adjusted from 0% to 100% (default is 35%).
- Brightness:Adjust the display brightness, choosing between OFF, Dim, Bright, and Auto (default).
- Auto Off:Set the auto-off time for the receiver to power off automatically after a period of audio silence. Options are 10, 20, or 30 minutes (default), or disabled.
- Jack Sense:Enable the receiver to automatically power on when a headphone jack is inserted and power off when disconnected. Enabled by default.
- Auto Power:Enable the receiver to automatically power on when removed from the charger and power down when connected to the charger. Enabled by default.
Beacons Tab
To configure beacon automations for the receiver profile, simply click on the ‘Beacons’ tab. You can subscribe to specific beacons and program them to trigger a specific channel when the beacon is detected by the receiver.
1. Select the beacon(s) you want the receivers to monitor.
2. Use the channel selector drop-down to choose the channel that will play when the beacon is detected.
3. Decide whether the audio should continue playing or disconnect when the receiver leaves the beacon’s range by enabling or disabling the Exit Timeout. The timeout value can be set from 10 seconds to 10 minutes, or it can be disabled (default).
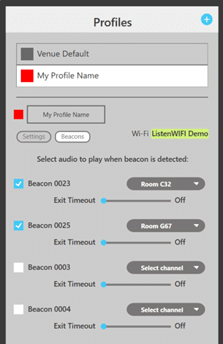
Assigning Profiles
Profiles can be loaded into receivers as follows:
1. Click and hold the profile name.
2. Drag and drop the profile name onto an individual receiver as shown.
Tip: You can drag and drop the profile name to the virtual docking stations “Clone Button” to apply the profile to ALL receivers in a dock.
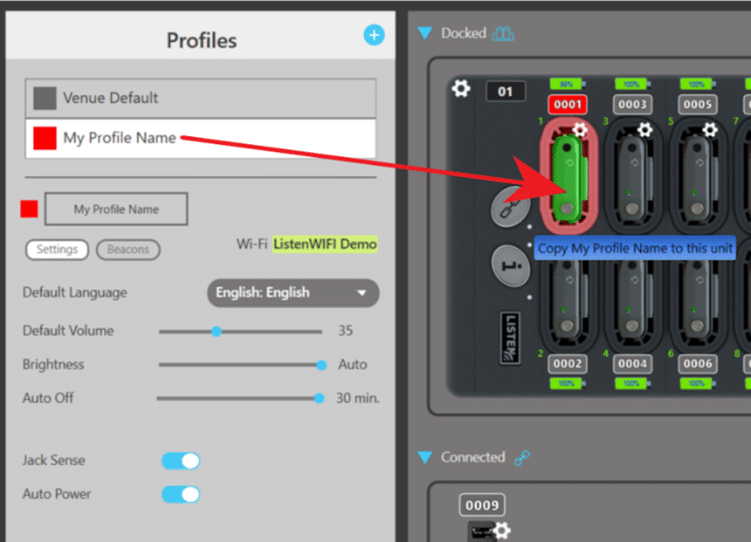
Receivers must be in a ‘Connected’ state (via Wi-Fi, USB, or Docking Station) to accept new profiles. When editing existing profiles already assigned to receivers, those receivers will automatically receive the profile updates, even if they are in a disconnected state.
Receiver Information
Click on a receiver’s gear wheel to view receivers detailed information, including the following:
- Unit ID: Receivers 4-digit identifier displayed on the unit and in the Manager software. Assigned by default and can be edited as needed.
- Battery: Indicates the current battery level.
- Firmware: The current firmware version installed on the receiver. Simply click on the button to check for and install available updates.
- Model: The specific model # or receiver SKU
- Serial: Unique serial number of the receiver
- MAC: The unique static MAC address of the receiver
- IP Address: The unique IPv4 DHCP client address of the receiver on the network
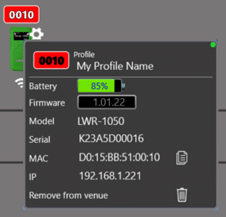
You can copy the serial, MAC, and IP address of a receiver to the clipboard by left clicking on the copy icon. Right-clicking will copy this information for all receivers. This data can then be pasted into a Word document or Notepad for IT staff or network administrators.
System Updates
ListenWIFI Manager automatically checks for software updates each time the application launches. If an update is available, you will be prompted to install it before proceeding. Updating the Manager first ensures compatibility, optimal performance, and access to the latest features.
The Manager also checks for firmware updates for all connected system components, such as Wi-Fi Audio Servers, Beacons, and Wi-Fi Audio Receivers. When you select a venue, a pop-up will highlight any available firmware updates for associated components. This serves as a reminder, but updates must still be applied individually by navigating to each component in the Manager. To update a component, click its firmware version button to download and install the latest firmware, then follow the on-screen prompts.
Keeping both the Manager and all system components up to date is essential for maintaining compatibility with current smartphones and operating systems, as well as unlocking new features.
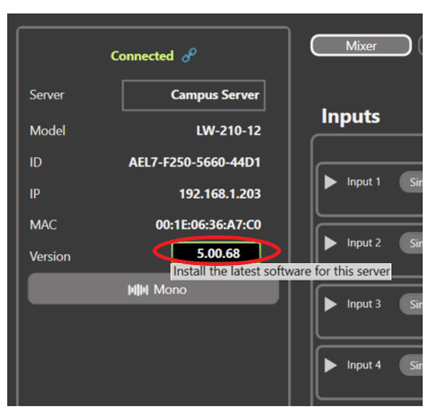
Updates should be applied at a convenient time when the ListenWIFI assistive listening system is not being actively used, as system components will not be operational during their updates process.
Security
Security is of utmost importance for any device that resides on your network. A single vulnerable device can compromise the security of your entire network, leading to data breaches, malware infections, and other cybersecurity threats. The ListenWIFI products, including Wi-Fi audio servers, receivers, mobile apps, and management software, have been hardened against security threats and vulnerabilities to ensure that the risk of unauthorized access is minimized and your network remains protected.
Maintaining network security is an ongoing process that requires regular monitoring, updates, and proactive measures to stay ahead of evolving threats. We are continually monitoring and identifying potential threats and vulnerabilities, subsequently pushing out software updates and patches to address those that could impact ListenWIFI. Therefore, we highly recommend keeping your software up to date on your ListenWIFI servers and products deployed on your network.
System hardening is a continuous effort on ListenWIFI to reduce the attack surface of system components, providing significantly improved security, functionality, and product performance. The following highlights some of the system hardening efforts that have been implemented on the ListenWIFI product platform to ensure our system remains both secure and reliable:
- Software and operating systems are updated and patched when vulnerabilities are discovered.
- All data in transit is encrypted using TLS 1.2 or higher, and stored data uses AES-256 encryption.
- Data transmission is contained to the Local Area Network (LAN) and never sent over the internet.
- Only very low-sensitivity data is stored on the ListenWIFI servers and is encrypted.
- HTTPS endpoint communications between servers and listening devices is limited to basic data transmittal to start/stop UDP audio streams and exchange basic visual assets.
- Access controls implemented allowing only authorized accounts access to management software and controls, following strong password management practices as outlined in the Password Policy section.
- Independent third-party security audits and penetration testing are conducted to ensure threats are addressed.
Network Protection and Resilience
ListenWIFI products are designed to:
- Avoid harming network functionality or misusing network resources.
- Prevent unauthorized access and protect against traffic manipulation or overload.
- Be resilient against denial-of-service (DoS) attacks and other common network-based threats.
These measures align with EN 18031-1 / ETSI EN 303 645 and EU Cyber Resilience Act requirements for secure-by-design products.
Update Notifications
Users are notified of available updates via email alerts, as well as upon launching the ListenWIFI Manager software. Updates may include security patches, firmware upgrades, and feature enhancements.
The security of ListenWIFI will also be dependent on your network architecture and implementation. For the best security and performance on your network, we recommend placing your Wi-Fi audio server on the same network that your listening devices will connect to and whitelisting communication to the server with client isolation implemented as applicable. This deployment will typically allow the required communication to occur between devices without having to modify your router or firewall rules and prohibits any unnecessary communications between client devices. Alternatively, the server and listening devices can be placed on separate networks; however, the proper ports must be opened and the ListenWIFI traffic must be routable, which can increase network vulnerabilities. Please reference our Network Configuration Guide for more details.
If you have questions or would like to review your deployment of ListenWIFI on your network, please reach out to one of our team members at Listen Technologies Corporation.
Privacy Policy
Your privacy is of great importance to Listen Technologies. As a user, you are valued by us, and we will take appropriate measures to protect the information provided by and collected from you in connection with the functions, facilities, products, and services offered.
Please read our full Privacy Policy statement here: https://www.listentech.com/privacy-policy/
Compliance
LWR-1050 Wi-Fi Audio Receiver
LWR-1050 FCC ID: OMD1050
LWR-1050 IC: 4011A-LWR1050
- FCC Regulation Statements:
This device complies with part 15 of the FCC Rules. Operation is subject to the following two conditions: (1) This device may not cause harmful interference, and (2) this device must accept any interference received, including interference that may cause undesired operation.
—Reorient or relocate the receiving antenna.
—Increase the separation between the equipment and receiver.
—Connect the equipment into an outlet on a circuit different from that to which the receiver is connected.
—Consult the dealer or an experienced radio/TV technician for help.
Any changes or modifications made to this device that are not expressly approved by Listen Technologies may void the user’s authority to operate the equipment.
- Industry Canada Statement:
CAN ICES-3 (B)/NMB-3 (B)
This Class B digital apparatus complies with Canadian ICES-003.
This device complies with Innovation, Science and Economic Development Canada’s licence-exempt RSSs. Operation is subject to the following two conditions:
(1) This device may not cause interference; and
(2) This device must accept any interference, including interference that may cause undesired operation of the device.
• In Canada, the LWR-1050 is restricted to indoor use only when it operates in 5170-5250 MHz.
Cet appareil numérique de la classe B est conforme à la norme NMB-003 du Canada.
Cet appareil est conforme aux flux RSS exemptés de licence d’Innovation, Science et Développement économique Canada. L’opération est soumise aux deux conditions suivantes:
(1) Cet appareil ne doit pas provoquer d’interférence; et
(2) Cet appareil doit accepter toute interférence, y compris les interférences susceptibles de provoquer un fonctionnement indésirable de l’appareil.
• Au Canada, l’utilisation du LWR-1050 est limitée à l’intérieur lorsqu’il fonctionne dans la bande 5170-5250 MHz.
LW-215-04 Wi-Fi Audio Server
LW-215-08 Wi-Fi Audio Server
LW-120 Wi-Fi Audio Server
LW-170 Wi-Fi Audio Server
- FCC Regulation Statements:
This device complies with part 15 of the FCC Rules. Operation is subject to the following two conditions: (1) This device may not cause harmful interference, and (2) this device must accept any interference received, including interference that may cause undesired operation.
Any changes or modifications made to this device that are not expressly approved by Listen Technologies may void the user’s authority to operate the equipment.
- Industry Canada Statement:
CAN ICES-3 (A)/NMB-3 (A)
This Class A digital apparatus complies with Canadian ICES-003.
This device complies with Innovation, Science and Economic Development Canada’s licence-exempt RSSs. Operation is subject to the following two conditions:
(1) This device may not cause interference; and
(2) This device must accept any interference, including interference that may cause undesired operation of the device.
Cet appareil numérique de la classe A est conforme à la norme NMB-003 du Canada.
Cet appareil est conforme aux flux RSS exemptés de licence d’Innovation, Science et Développement économique Canada. L’opération est soumise aux deux conditions suivantes:
(1) Cet appareil ne doit pas provoquer d’interférence; et
(2) Cet appareil doit accepter toute interférence, y compris les interférences susceptibles de provoquer un fonctionnement indésirable de l’appareil.
LA-490 Bluetooth/IR Beacon
- For Users in the US and Canada
LA-490 FCC ID: OMDLA490-001
LA-490 IC: 4011A-LA490001
- FCC Regulation Statements:
This device complies with part 15 of the FCC Rules. Operation is subject to the following two conditions: (1) These devices may not cause harmful interference, and (2)these devices must accept any interference received, including interference that may cause undesirable operation.
Note: This equipment has been tested and found to comply with the limits for a class B digital device, pursuant to part 15 of the FCC Rules. These limits are designed to provide reasonable protection against harmful interference in a residential installation. This equipment generates, uses and can radiate radio frequency energy and if not installed and used in accordance with the instructions, may cause harmful interference to radio communications. However, there is no guarantee that interference will not occur in a particular installation. If this equipment does cause harmful interference to radio or television reception, which can be determined by turning the equipment off and on, the user is encouraged to try to correct the interference by one or more of the following measures:
- Reorient or relocate the receiving antenna.
- Increase the separation between the equipment and receiver.
- Connect the equipment into an outlet on a circuit different from that to which the receiver is connected.
- Consult the dealer or an experienced radio/TV technician for help.
This equipment complies with FCC radiation exposure limits set forth for an uncontrolled environment. End users must follow the specific operating instructions for satisfying RF exposure compliance. This transmitter must be at least 20 cm from the user and must not be co-located or operating in conjunction with any other antenna or transmitter.
The information in this guide may change without notice. The manufacturer assumes no responsibility for any errors that may appear in this guide.
Changes or modification to this device not expressly approved by Listen Technologies for compliance could void the user’s authority to operate this device.
- Industry Canada Statement:
CAN ICES-3 (B)/NMB-3 (B)
This Class B digital apparatus complies with Canadian ICES-003.
This device contains licence-exempt transmitter(s)/receiver(s) that comply with Innovation, Science and Economic Development Canada’s licence-exempt RSS(s). Operation is subject to the following two conditions:
- This device may not cause interference.
- This device must accept any interference, including interference that may cause undesired operation of the device.
Cet appareil numérique de la classe B est conforme à la norme NMB-003 du Canada.
Cet appareil contient des émetteurs/récepteurs exempts de licence qui sontconformes aux RSS exemptés de licence d’Innovation, Sciences et Développement économique Canada. L’exploitation est soumise aux deux conditions suivantes:
- Cet appareil ne doit pas provoquer d’interférences.
- Cet appareil doit accepter toute interférence, y compris les interferences susceptibles de provoquer un fonctionnement indésirable de l’appareil.
- ISED
Radiation Exposure Statement: This equipment complies with the IC RSS-102 radiation exposure limits set forth for an uncontrolled environment. This equipment should be installed and operated with a minimum distance of 20 cm between the radiator and your body.
Énoncé d’exposition aux rayonnements: Cet équipement est conforme aux limitesd’exposition aux rayonnements ioniques RSS-102 Pour un environnement in contrôlé. Cet équipement doit être installé et utilisé avec un Distance minimale de 20 cm entrele radiateur et votre corps.
- For Users in the European Union
This device is a proximity Beacon operating in the 2.4 GHz frequency band from 2.400GHz to 2.482 GHz at a maximum power of 2.5 dBm. The usage of this device is generally allowed in all EU countries, Australia, New Zealand, Singapore, and Hong Kong. Product labeling information such as serial number, manufacturer, and additional regulatory information is found on the product label on the back of the device or in the battery compartment. To view, remove device from the mounting bracket.
In compliance with the following requirements
WEEE Directive (2012/19/EU)
Battery Directive (2006/66/EC & 2013/56/EU)
If you wish to discard electrical and electronic equipment (EEE), please contact your dealer or supplier for further information.
Notes on Disposal
The symbol of the crossed-out wheeled bin on the product, the batteries and/or the packaging indicates that these products must be disposed of separately at the end of their operational lifetime in accordance with the national legislation. For packaging disposal, please observe the legal regulations on waste segregation applicable in your country.
The separate collection of waste electrical and electronic equipment, batteries and packaging’s is used to promote the reuse and recycling and to prevent negative effects caused by e.g., potentially hazardous substances contained in these products. Herewith you make an important contribution to the protection of the environment and public health.
EU Declaration of Conformity
Hereby, Listen Technologies declares that the radio equipment type Listen Bluetooth/IR Beacon LA-490 is in compliance with:
Radio Equipment Directive 2014/53/EU
EU RoHS 3 Directive (EU) 2015/863
Low Voltage Directory 2014/35/EU
EMC Directive 2014/30/EU
The full text of the EU declaration of conformity is available at the following internet address: www.listentech.com/support/declaration-conformity-documents/
LA-480 Docking Station 16
LA-481 Docking Station Case 16
LA-482 Docking Station 4
- FCC Regulation Statements:
This device complies with part 15 of the FCC Rules. Operation is subject to the following two conditions: (1) This device may not cause harmful interference, and (2) this device must accept any interference received, including interference that may cause undesired operation.
—Reorient or relocate the receiving antenna.
—Increase the separation between the equipment and receiver.
—Connect the equipment into an outlet on a circuit different from that to which the receiver is connected.
—Consult the dealer or an experienced radio/TV technician for help.
Any changes or modifications made to this device that are not expressly approved by Listen Technologies may void the user’s authority to operate the equipment.
- Industry Canada Statement:
CAN ICES-3 (B)/NMB-3 (B)
This Class B digital apparatus complies with Canadian ICES-003.
This device complies with Innovation, Science and Economic Development Canada’s licence-exempt RSSs. Operation is subject to the following two conditions:
(1) This device may not cause interference; and
(2) This device must accept any interference, including interference that may cause undesired operation of the device.
Cet appareil numérique de la classe B est conforme à la norme NMB-003 du Canada.
Cet appareil est conforme aux flux RSS exemptés de licence d’Innovation, Science et Développement économique Canada. L’opération est soumise aux deux conditions suivantes:
(1) Cet appareil ne doit pas provoquer d’interférence; et
(2) Cet appareil doit accepter toute interférence, y compris les interférences susceptibles de provoquer un fonctionnement indésirable de l’appareil.
Cybersecurity Compliance
ListenWIFI products are designed and maintained to meet the following cybersecurity standards and regulations:
- EN 18031-1 (Radio Equipment Directive cybersecurity requirements)
- ETSI EN 303 645 (Baseline security for network-connected devices)
- EU Cyber Resilience Act (Regulation EU 2024/2847) (Secure-by-design and vulnerability handling)
- UK PSTI Act (Note: ListenWIFI products are designed for professional use and may fall outside PSTI scope as they are not marketed to consumers)
These measures include:
- Secure-by-design principles
- Network protection and resilience against DoS attacks, unauthorized access, and traffic manipulation
- Coordinated vulnerability disclosure and lifecycle security updates
Password Policy
Aligns with EN 18031-1, PSTI, and EU 2024/2847 Cybersecurity Standards
To ensure secure access and protect system integrity across all user roles, ListenWIFI implements the following password management practices:
1. Administrator Accounts
Owner Accounts
- Created during initial system setup via ListenWIFI Manager (LWM).
- Owners select their own password, which can be changed at any time.
- Password recovery is available via email-based reset.
- Owners have full access to system configuration and channel management.
Operator Accounts
- Created by an Owner via LWM by entering the Operator’s email and confirming with the “+” action.
- A temporary password is auto-generated and displayed for secure handoff.
- Upon first login, Operators are prompted to change their password.
- Passwords can be updated at any time via the login interface.
- Operators have limited access to branding and inventory functions only.
- Password recovery is available via email-based reset.
Note: ListenWIFI does not use default passwords. All credentials are user-defined or securely generated during setup.
2. Channel Access Passwords
- Owners may assign passwords to individual audio channels to restrict access.
- These passwords apply across all access methods (QR code, beacon, manual selection).
- Operators cannot modify channel passwords.
- End users must enter the channel password when prompted on their listening device (mobile app or receiver).
- Distribution of channel passwords is managed by the venue (e.g., printed, verbal, digital).
3. Password Requirements & Recommendations
To comply with EN 18031-1 and PSTI, ListenWIFI recommends the following for all administrator passwords:
- Minimum of 8 characters
- At least one uppercase letter, one lowercase letter, one number, and one special character
- Avoid common passwords (e.g., “123456”, “password”)
- Change passwords periodically (e.g., every 6 months)
- Do not reuse previous passwords
- Do not share passwords via unsecured channels
Note: While ListenWIFI does not enforce complexity requirements by default, venues may implement internal policies to strengthen password hygiene.
Each Operator account is assigned a unique temporary password during creation.
4. Temporary Passwords
- Automatically generated for new Operator accounts and password recovery.
- Valid for one-time use only; users must change the password upon login.
- Temporary passwords are not stored and must be securely communicated.
5. Recovery Protocol
- If an Owner or Operator forgets their password, a secure reset link is sent to their registered email.
- Upon login with the temporary password, users must immediately set a new password.
6. Lifecycle & Support
- Password management practices are maintained throughout the product’s supported lifecycle.
- Updates are provided as needed to meet evolving cybersecurity standards and regulatory requirements.
Vulnerability Disclosure Policy
Effective Date: August 18, 2025
Applicable Standards:
- EN 18031-1 (GEC-1) / ETSI EN 303 645 (Provision 5.1)
- EU Cyber Resilience Act (Regulation EU 2024/2847)
- UK Product Security and Telecommunications Infrastructure (PSTI) Act (Note: ListenWIFI products are designed for professional use and may fall outside the scope of PSTI as they are not marketed to consumers)
1. Purpose
This policy outlines our commitment to identifying, disclosing, and remediating security vulnerabilities in our products with digital elements. It ensures compliance with UK, EU, and international cybersecurity regulations.
2. Scope
This policy applies exclusively to the ListenWIFI product line developed by Listen Technologies Corporation. These products are designed for professional audio environments and include network-connected devices that operate over WiFi or Bluetooth, using either wired or wireless connections. All ListenWIFI products are distributed through licensed ProAV dealers, integrators, and distributors, and are not marketed to consumers.
3. Vulnerability Disclosure (External Reporting)
We welcome reports from security researchers, customers, and other stakeholders.
Reporting Method:
- Email: Jeff.Waldvogel@listentech.com
Instructions for Reporting:
- Include product name, version, and detailed steps to reproduce the issue.
- Do not exploit or publicly disclose the vulnerability before remediation.
Acknowledgment Timeline:
- We will acknowledge receipt within 24 hours (EU CRA requirement).
- We aim to provide a status update within 10 business days.
Safe Harbor:
- We will not pursue legal action against good-faith researchers who follow this policy.
Vulnerability Handling (Internal Response)
Upon discovery or disclosure of a vulnerability, we will:
- Log and assess the report for severity and impact.
- Assign a response team to investigate and remediate.
- Notify affected users if the vulnerability poses a risk to safety or data integrity.
- Issue security updates within a reasonable timeframe (typically within 90 days).
- Maintain records of all vulnerabilities and actions taken.
Reporting to Authorities:
- For actively exploited vulnerabilities, we will notify ENISA and relevant CSIRTs within 72 hours (EU CRA).
- A final report will be submitted within 14 days of initial notification.
Security Update Commitment:
- We commit to providing security updates for a minimum of 5 years from product release (EU CRA recommendation).
- Update delivery methods include OTA updates, downloadable patches, or firmware upgrades.
- Users are notified of available updates via email alerts, as well as upon launching the ListenWIFI Manager software.
5. Public Disclosure
We support coordinated disclosure and may publicly acknowledge resolved vulnerabilities and contributors (with consent).
6. Policy Availability and Review
This policy is publicly accessible via our system manual and online documentation.
It will be reviewed annually or upon regulatory changes.
Contact
Listen Technologies Corporation – Security & Compliance Team
Contact: Jeff Waldvogel, Compliance Engineer
Email: Jeff.Waldvogel@listentech.com
Copyright © 1998 – 2026 Listen Technologies Corporation. All rights reserved.
Listen, ListenWIFI, and related marks and logos are registered trademarks of Listen Technologies Corporation.
The Bluetooth® word mark and logos are registered trademarks owned by Bluetooth SIG, Inc., and any use of such marks by Listen Technologies Corporation is under license.
Windows® is a trademark of the Microsoft group of companies.
